Welcome to Labkafe ~ Orientallabs Retail Services Private Limited
Jul 23, 2021 / By Soumen Mondal / in Learning Physics Experiments
Aim:
To determine the radius of curvature of a given spherical surface by a Spherometer.
Apparatus:
Theory:
A spherometer is a measuring instrument used to measure the radius of curvature of a spherical surface and a very small thickness.
Figure 3.1 is a schematic diagram of a single disk spherometer. It consists of a central leg OS, which can be raised or lowered through a threaded hole V (nut) at the centre of the frame F. The metallic triangular frame F supported on three legs of equal length A, B and C. The lower tips of the legs form three corners of an equilateral triangle ABC and lie on the periphery of a base circle of known radius, r. The lower tip of the central screw, when lowered to the plane (formed by the tips of legs A, B and C) touches the centre of triangle ABC. A circular scale (disc) D is attached to the screw. The circular scale may have 50 or 100 divisions engraved on it. A vertical scale P marked in millimetres or half-millimetres, called main scale or pitch scale P is also fixed parallel to the central screw, at one end of the frame F. This scale is kept very close to the rim of disc D but it does not touch the disc D. This scale reads the vertical distance when the central leg moves through the hole V.
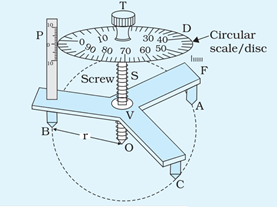
Fig 3.1
Principle:
Pitch of a Spherometer
The vertical distance moved by the screw S in one complete rotation of the circular Scale/Disc D is called the pitch (p) of the spherometer. To find the pitch, give full rotation to the screw (say 4 times) and note the distance (d) advanced over the pitch scale.
If the distance d is 4 mm The pitch can be represented as,

Least Count of the Screw Gauge
The Least count (LC) is the distance moved by the spherometer screw, when the screw is turned through 1 division on the circular. We are using a spherometer which has 100 divisions (N) on the disc. The least count can be calculated using the formula,

The formula for the radius of curvature of a spherical surface
Approach 1:
From the figure 3.3, O is the centre of the circle. OE = OA = R, radius of the circle. F is the tip of the screw at the same plane with A, B and C. EF = h, AF = a and ∠AFO =
900.
Therefore, geometrically we can write,
OA2 = OF2 + FA2
or, R2 = (R-h)2 + a2
= R2 -2.R.h + h2 + a2
∴ R = (h2 + a2 )/2h
Now, let l be the distance between any two legs of the spherometer as shown in figure 3.6, then from geometry we have, a = . Thus the radius of curvature of the spherical surface can be given by,
∴ R = ( 3h2 + l2 )/6h
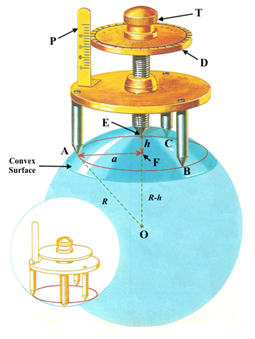
Fig 3.3
Approach 2:
From the figure 3.4, the circle is passing through A and C. O is the centre of the circle. OE =R, radius of the circle. F is the tip of the screw at the same plane with A, B and C. CF = h, AF = a ∠EAC = 900.
∴ CE2 = AE2 + AC2
or, (2R2) = (AF2 + FE2) + (CF2 + AF2)
= a2 + (2R -h)2 + h2 + a2
∴ R= a2/2h+ h/2
Now, let l be the distance between any two legs of the spherometer or the side of the equilateral triangle ABC (Fig. 3.4), then from geometry we have, a = l/√3. Thus the radius of curvature of the spherical surface can be given by,
R = a2/2h+ h/2
or, R = l2/6h+ h/2
Diagram:
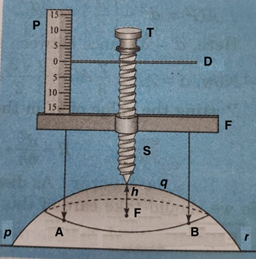
Fig 3.4
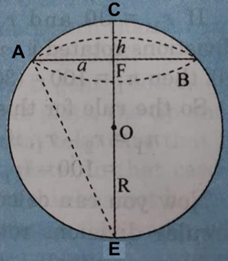
Fig 3.5
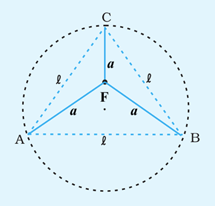
Fig. 3.6
Procedure:
Observations:
Least count of spherometer :
Total number of divisions is the in circular scale, N = _______
One linear scale division, L.S.D. = ____ mm
Distance moved by the screw for 4 rotations, d = ________ mm
Pitch of the screw, p = 4/d = ____mm
Therefore, Least Count, L.C. = p/N= ______________mm
Distance between two legs of spherometer:
AB = _______ cm, BC = _______cm, CA = _________cm
∴ l = (AB + BC+ CA)/3 = _______________________cm
Table 3.1 Table for height (h)
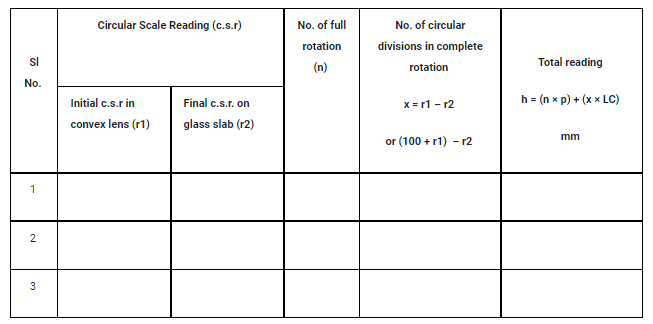
Mean value of sagitta, h = _________________ mm = ________________cm
Calculation:
Radius of curvature of the given convex surface, R = (3h2 + l2 )/6h =…………………………..cm
or, Radius of curvature of the given convex surface, R = l2/6h+ h/2 =…………………………… cm
Precautions:
Reference:
Your may checkout our blog on SCREW GAUGE & LEAST COUNT
About Labkafe: Lab Equipment Manufacturer & Exporter
We are a School laboratory furniture and Lab equipment manufacturer and supplier. In laboratory furniture for school, we first design the entire laboratory room keeping in mind the requirements as per affiliation CBSE Bye-Laws. Also, we take care of the complete designing and installation of laboratory furniture.
In the lab equipment section, we have a wide range of glassware, chemicals, equipment and other lab accessories. Most of them are available for order online on our website but some of them can be procured on demand.
If you have need:-
do drop a message through chat or mail us at [email protected] or call +919007218364 and we’ll get in touch with you.
Labkafe is among the most promising laboratory supplies vendors in India. We manufacture and supply lab equipment, lab furniture, lab consumables, lab glassware, lab machines and more! Not only we manufacture lab items, we export to international resellers too. We fulfill CBSE ICSE ISC IGCSE IB State board affiliation requirements for schools by providing affiliation packages to schools. Our featured products are:
Chosen by over 1200 schools, colleges, universities, research labs, government agencies and private companies to build or renovate their laboratories, Labkafe stands as your best friend when it comes to labs. We are also a registered OEM on GeM. Our clients love us because we provide the best quality of lab products, free demos, free installation, and support for ever.
Do you wish to experience excellence too? Why not contact us today at [email protected], or call 9147163562 directly ‒ we are always available to serve. You can also use the chat button in the corner to connect to one of our representatives instantly!
Feb 16, 2023 by Biswajit Sana
Jun 03, 2022 by Swarna Karmakar